Azure Functions – Designing Compute Solutions

Azure Functions falls into the Functions as a Service (FaaS) or serverless category. This means that you can run Azure Functions using a consumption plan whereby you only pay for the service as it is being executed. In comparison, Azure App Service runs on a service plan in which you define the CPU and RAM.

With Azure Functions, you don’t need to define CPU and RAM as the Azure platform automatically allocates whatever resources are required to complete the operation. Because of this, functions have a default timeout of 5 minutes with a maximum of 10 minutes – in other words, if you have a function that would run for longer than 10 minutes, you may need to consider an alternative approach.

Tip

Azure Functions can be run as an App Service plan the same as App Service. This can be useful if you have functions that will run for longer than 10 minutes, if you have spare capacity in an existing service plan, or if you require support for VNet integration. Using an App Service plan means you pay for the service in the same way as App Service, that is, you pay for the provisioned CPU and RAM whether you are using it or not.

Functions are event-driven; this means they will execute your code in response to a trigger being activated. The following triggers are available:

  • HTTPTrigger: The function is executed in response to a service calling an API endpoint over HTTP/HTTPS.
  • TimerTrigger: Executes on a schedule.
  • GitHub webhook: Responds to events that occur in your GitHub repositories.
  • CosmosDBTrigger: Processes Azure Cosmos DB documents when added or updated in collections in a NoSQL database.
  • BlobTrigger: Processes Azure Storage blobs when they are added to containers.
  • QueueTrigger: Responds to messages as they arrive in an Azure Storage queue.
  • EventHubTrigger: Responds to events delivered to an Azure Event Hub.
  • ServiceBusQueueTrigger: Connects your code to other Azure services or on-premises services by listening to message queues.
  • ServiceBusTopicTrigger: Connects your code to other Azure services or on-premises services by subscribing to topics.

Once triggered, an Azure function can then run code and interact with other Azure services for reading and writing data, including the following:

  • Azure Cosmos DB
  • Azure Event Hubs
  • Azure Event Grid
  • Azure Notification Hubs
  • Azure Service Bus (queues and topics)
  • Azure Storage (blob, queues, and tables)
  • On-premises (using Service Bus)

By combining different triggers and outputs, you can easily create a range of possible functions, as we see in the following diagram:

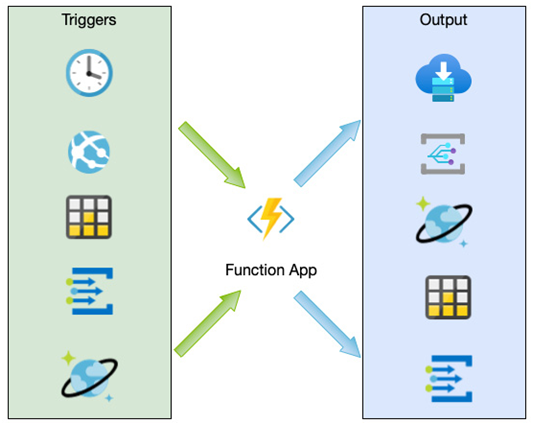
Figure 7.6 – Combining triggers and outputs with a Functions app

Azure Functions is therefore well suited to event-based microservice applications that are short-run and are not continuously activated. As with App Service, Functions supports a range of languages, including C#, F#, JavaScript, Python, and PowerShell Core.

Routing – Network Connectivity and Security

By default, all traffic in Azure follows pre-defined routes that are set up within the VNETs. These routes ensure traffic flows correctly between VNETs and out to the internet as required.

When more advanced routing is required, you can set up your routes to force the traffic through set paths, sometimes known as service chaining.

An example is where you need to route your Azure VM traffic back on-premises for your internal ranges. In this instance, you could create a route that sends all traffic destined for your internal ranges to the VPN gateway in your hub VNET.

Another example would be when you wish to have all internet traffic traverse a central firewall; in this instance, you would define a route to send all internet traffic to a firewall device you have in a peered VNET.

When creating routes, you can create either user-defined routes or Border Gateway Protocol (BGP).

BGP automatically exchanges routing information between two or more networks. In Azure, it can be used to advertise routes from your on-premises network to Azure when using ExpressRoute or a site-to-site VPN.

Alternatively, you can create your custom route; although this is more manual and has a higher administrative overhead, it does provide complete control.

When defining a user-defined route, we set a descriptive name, an address prefix that specifies the address range that we will redirect traffic for, and the next hop. The next hop is where traffic will be routed through and can be any of the following:

  • Virtual appliance: Such as a firewall or other routing device
  • VNET gateway: Used when directing traffic through a VPN gateway
  • VNET: Sends all traffic to a specific VNET
  • Internet: Sends traffic to Azure internet routers
  • None: Drops all data (that is, blocks all traffic for that range)

For example, if we want to route all traffic through a firewall device with the address of 10.0.0.10, we would create the following custom route:

Figure 8.15 – Example user-defined route

We can also add additional routes for other rules; for example, routing traffic through the firewall, we could add another rule to route internal bound traffic to a VPN gateway.

Because we can have a mixture of custom routes, system routes, and BGP routes, Azure uses the following order to decide where to send traffic in the event there is a conflict. That order is as follows:

  1. User-defined routes
  2. BGP routes
  3. System routes

By using a combination, we can precisely control traffic depending on our precise requirements.

Another aspect of routing traffic is when we need to use load balancing components to share traffic between one or more services, and we will discuss this in the next section.

On-premises resources – Network Connectivity and Security

To connect to an Azure VPN gateway, you will need a VPN device on your corporate network that supports policy-based or route-based VPN gateways. It also needs to have a public IPv4 network address.

Azure resources

Within Azure, you need to set up the following components:

  • VNET: The address space used by the VNET must not overlap with your corporate ranges.
  • Gateway subnet: The VPN gateway must be installed in a specific subnet, and it must be called GatewaySubnet. It must have a range of at least /27 (32 addresses).
  • Public IP address: An IP address that can be connected to from the public network (internet).
  • Local network gateway: This defines the on-premises gateway and configuration.
  • VNET gateway: An Azure VPN or ExpressRoute gateway.

The following diagram shows how this might look:

Figure 8.12 – VPN gateway

As we can see from the preceding diagram, a VPN connection is made to a specific subnet and VNET within Azure. In most cases, you would need to connect multiple VNETs to the same connection, which we can perform by peering the connected VNET to your workload VNETs.

This is often called a hub-spoke model; we can see an example hub-spoke model in the following diagram:

Figure 8.13 – Hub-spoke architecture

Earlier, we stated that connections between VNETs are not transitive, therefore to set up the hub-spoke architecture, we must use a gateway transit – we do this when we create our peering connection between the spoke VNET (which contains our workloads) and the hub VNET (which includes the VNET gateway). On the options when creating a peering request from the spoke to the hub, select the Use the remote virtual network’s gateway option, as we can see in the following example:

Figure 8.14 – Setting the peering option to use gateway transit

Using a VPN is a simple way to connect securely to Azure. However, you are still using the public network; thus, connectivity and performance cannot be guaranteed. For a more robust and direct connection into Azure, companies can leverage ExpressRoute.

ExpressRoute

ExpressRoute provides a dedicated and utterly private connection into Azure, Office 365, and Dynamics 365. Throughput is significantly increased since connections are more reliable with minimal latency.

Connectivity is via authorized network providers who ensure connections are highly available; this means you get redundancy built-in.

There are three different models to choose from when ordering an ExpressRoute – CloudExchange co-location, point-to-point Ethernet connection, and any-to-any connection:

  • CloudExchange co-location is for companies that house their existing data center with an internet service provider.
  • Point-to-point connections are dedicated connections between your premises and Azure.
  • Any-to-any is for companies that have existing WAN infrastructure. Microsoft can connect to that existing network to provide connectivity from any of your offices.

A key aspect of ExpressRoute is that your connectivity is via private routes; it does not traverse the public internet – except for Content Delivery Network (CDN) components, which by design must leverage the internet to function.

As you leverage more advanced network options, you must have tighter control over traffic flow between VNETs and your on-premises network.

VNET peering – Network Connectivity and Security

Any two VNETs can be connected using peering, and there are two types of peering available:

  • VNET peering, which connects two VNETs in the same region
  • Global VNET peering, which connects two VNETs in different regions

You can connect two VNETs that are in different subscriptions. However, you must ensure that the address spaces in each VNET do not overlap. So, if VNET 1 and VNET 2 both use the address range of 10.0.0.0/16, the peering will fail.

Peerings between VNETs are also non-transitive – this means that if you have three VNETs – VNET 1, VNET 2, and VNET 3 – and you create a peering between VNET 1 and VNET 2 and VNET 2 and VNET 3, devices in VNET 1 will not be able to access a resource in VNET 3 – in other words, you cannot traverse the two peers. Instead, you would have to explicitly connect VNET 1 to VNET 3 as well, as we can see in the following diagram:

Figure 8.11 – Peerings are not transitive

Peerings between VNETs are not the only type of network you may need to connect; the other common scenario is connecting on-premises networks into Azure. For this, we can use a VPN gateway.

VPN gateways

When you need to connect an on-premises network to Azure, you can use a VPN gateway. A VPN gateway uses a gateway device on your corporate network and a gateway device in Azure. The two are then connected with a VPN that uses the public network to create an encrypted route between your two gateways. In other words, you use the internet but your traffic is encrypted and, therefore, secure.

You can use two types of VPN – a Point to Site (P2S) VPN, used by individual clients to connect directly to a remote gateway, and a Site to Site (S2S) VPN, used to connect networks.

When creating a VPN connection, you can choose between a policy-based VPN or a route-based VPN.

Policy-based VPNs

Policy-based VPNs are generally used for connections using legacy VPN gateways, as they are not as flexible as route-based. Policy-based VPNs use IKEv1 protocols and static routing to define the source and destination network ranges in the policy, rather than in a routing table.

Route-based VPNs

Route-based VPNs are the preferred choice and should be used unless legacy requirements prevent it. Route-based VPNs use IKEv2 and support dynamic routing protocols whereby routing tables direct traffic based on discovery.

Important Note

Internet Key Exchange (IKE) v1 and v2 are VPN encryption protocols that ensure traffic is encrypted between two points by authenticating both the client and the server and then agreeing on an actual encryption method. IKEv2 is the successor to IKEv1. It is faster and provides greater functionality.

When creating a VPN, you have different sizes available, and the choice of size, or SKU, is dependent on your requirements. The following table shows the current differences:

The basic VPN is only recommended for use for dev/test and not for production. Also, basic does not support IKEv2 or RADIUS authentication. This may impact you depending on the clients using the VPN. For example, Mac computers do not support IKEv1 and cannot use a basic VPN for a P2S connection.

When creating a VPN connection, you need several services and components set up.

Private endpoint connections – Network Connectivity and Security

We have said that service endpoints assign an internal IP to services that are then used to direct the flow of traffic to it. However, the actual IP is hidden and can therefore not be referenced by yourself.

There are times when you need to access a service such as SQL or a storage account via a private IP – either for direct connectivity from an on-premises network or when you have strict firewall policies between your users and your solution.

For these scenarios, Private endpoint connections can be used to assign private IP addresses to certain Azure services. Private endpoints are very similar to service endpoints, except you have visibility of the underlying IP address and so they can therefore be used across VPNs and ExpressRoute.

However, private endpoints rely on DNS to function correctly. As most services use host headers (that is, an FQDN) to determine your individual backend service, connecting via the IP itself does not work. Instead, you must set up a DNS record that sets your service to the internal IP.

For example, if you create a private endpoint for your storage account called mystorage that uses an IP address of 10.0.0.10, to access the service securely, you must create a DNS record so that mystorage.blob.core.windows.net resolves to 10.0.0.10.

This can be performed by either creating DNS records in your DNS service or forwarding the request to an Azure private zone and having the internal Azure DNS service resolve it for you.

Azure private endpoints support more services than service endpoints and are, therefore, the only option in some circumstances. In addition to the services supported by service endpoints, private endpoints also support the following:

  • Azure Automation
  • Azure IoT Hub
  • Azure Kubernetes Service – Kubernetes API
  • Azure Search
  • Azure App Configuration
  • Azure Backup
  • Azure Relay
  • Azure Event Grid
  • Azure Machine Learning
  • SignalR
  • Azure Monitor
  • Azure File Sync

Using a combination of NSGs, ASGs, Azure Firewall, service endpoints, and private endpoints, you have the tools to secure your workloads internally and externally. Next, we will examine how we can extend the actual VNETs by exploring the different options for connecting into them or connecting different VNETs.

Connectivity

A simple, standalone solution may only require a single VNET, and especially if your service is an externally facing application for clients, you may not need to create anything more complicated.

However, for enterprise applications that contain many different services, or for hybrid scenarios where you need to connect securely to Azure from an on-premises network, you must consider the other options for providing connectivity.

We will start by looking at connecting two VNETs.

Previously, we separated services within different subnets. However, each of those subnets was in the same subnet. Because of this, connectivity between the devices was automatic – other than defining NSG rules, connectivity just happened.

More complex solutions may be built across multiple VNETs, and these VNETs may or may not be in the same region. By default, communication between VNETs is not enabled. Therefore you must set this up if required. The simplest way to achieve this connectivity is with VNET peering.

Service endpoints – Network Connectivity and Security

Many services are exposed via a public address or URL. For example, Blob Storage is accessed via <accountname>.blob.core.windows.net. Even if your application is running on a VM connected to a VNET, communication to the default endpoint will be the public address, and full access to all IPs, internal and external, is allowed.

For public-facing systems, this may be desirable; however, if you need the backend service to be protected from the outside and only accessible internally, you can use a service endpoint.

Service endpoints provide direct and secure access from one Azure service to another over the Azure backbone. Internally, the service is given a private IP address, which is used instead of the default public IP address. Traffic from the source is then allowed, and external traffic becomes blocked, as we see in the following example:

Figure 8.8 – Protecting access with service endpoints

Although using service endpoints enables private IP addresses on the service, this address is not exposed or manageable by you. One effect of this is that although Azure-hosted services can connect to the service, on-premises systems cannot access it over a VPN or ExpressRoute. For these scenarios, an alternative solution called a private endpoint can be used, which we will cover in the next sub-section, or using an ExpressRoute with Microsoft peering using a NAT IP address.

Important Note

When you set up an ExpressRoute into Azure, you have the option of using Microsoft peering or private peering. Microsoft peering ensures all connectivity in the Office 365 platform. Azure goes over the ExpressRoute instead of private peering, sending only traffic destined for internal IP ranges to use the ExpressRoute. In contrast, public services are accessed via public endpoints. The most common form of connectivity is private peering; Microsoft peering is only recommended for specific scenarios. See https://docs.microsoft.com/en-us/microsoft-365/enterprise/azure-expressroute?view=o365-worldwide for more details.

To use service endpoints, the service itself must be enabled on the subnet, and the service you wish to lock down must have the public network option turned off and the source subnet added as an allowable source.

Important Note

Service endpoints ignore NSGs – therefore, any rules you have in place and attached to the secure subnet are effectively ignored. This only affects the point-to-point connection between the subnet and the service endpoint. All other NSG rules still hold.

At the time of writing, the following Azure services support service endpoints:

  • Azure Storage
  • Azure Key Vault
  • Azure SQL Database
  • Azure Synapse Analytics
  • Azure PostgreSQL Server
  • Azure MySQL Server
  • Azure MariaDB
  • Azure Cosmos DB
  • Azure Service Bus
  • Azure Event Hubs
  • Azure App Service
  • Azure Cognitive Services
  • Azure Container Registry

To enable service endpoints on a subnet, in the Azure portal, go to the properties of the VNET you wish to use, select the Subnets blade on the left-hand menu, then select your subnet. The subnet configuration window appears with the option to choose one or more services, as we can see in the following screenshot. Once you have made changes, click Save:

Figure 8.9 – Enabling service endpoints on a subnet

Once enabled, you can then restrict access to your backend service. In the following example, we will limit access to a storage account from a subnet:

  1. Go to the Azure portal at https://portal.azure.com.
  2. In the search bar, search for and select Storage accounts.
  3. Select the storage account you wish to restrict access to.
  4. On the left-hand menu, click the Networking option.
  5. Change the Allow access from option from All networks to Selected networks.
  6. Click + Add existing virtual network.
  7. Select the VNET and subnet you want to restrict access to.
  8. Click Save.

The following screenshot shows an example of a secure storage account:

Figure 8.10 – Restricting VNET access

Once set up, any access except the defined VNET will be denied, and any traffic from services on the VNET to the storage account will now be directly over the Azure backbone.

You may have noticed another option in the Networking tab – Private endpoint connections.

Application Security Groups – Network Connectivity and Security

An ASG is another way of grouping together resources instead of just allowing all traffic to all resources on your VNET. For example, you may want one to define a single NSG that applies to all subnets; however, you may have a mixture of services, such as database servers and web servers, across those subnets.

You can define an ASG and attach your web servers to that ASG, and another ASG that groups your database servers. In your NSG, you then set the HTTPS inbound rule to use the ASG as the destination rather than the whole subnet, VNET, or individual IPs. In this configuration, even though you have a common NSG, you can still uniquely allow access to specific server groups.

The following diagram shows an example of this type of configuration:

Figure 8.6 – Example architecture using NSGs and ASGs

In the preceding example, App1 and App2 are part of the ASGApps ASG, and Db1 and Db2 are part of the ASGDb ASG.

The NSG rulesets would then be as follows:

With the preceding in place, HTTPS inbound would only be allowed to App1 and App2, and port 1433 would only be allowed from App1 and App2.

ASGs and NSGs are great for discrete services; however, there are some rules that you may always want to apply, for example, blocking all outbound access to certain services such as FTP. A better option might be to create a central firewall that all your services route through in this scenario.

Azure Firewall

Whereas individual NSGs and ASGs form part of your security strategy, building multiple network security layers, especially in enterprise systems, is even better.

Azure Firewall is a cloud-based, fully managed network security appliance that would typically be placed at the edge of your network. This means that you would not usually have one firewall per solution or even subscription. Instead, you would have one per region and have all other devices, even those in different subscriptions, route through to it, as in the following example:

Figure 8.7 – Azure Firewall in a hub/spoke model

Azure Firewall offers some of the functionality you can achieve from NSGs, such as network traffic filtering based on port and IP or service tags. Over and above these basic services, Azure Firewall also offers the following:

  • High availability and scalability: As a managed offering, you don’t need to worry about building multiple VMs with load balancers or how much your peak traffic might be. Azure Firewall will automatically scale as required, is fully resilient, and supports availability zones.
  • FQDN tags and FQDN filters: As well as IP, addressing, and service tags, Azure Firewall also allows you to define FQDNs. FQDN tags are similar to service tags but support a more comprehensive range of services, such as Windows Update.
  • Outgoing SNAT and inbound DNAT support: If you use public IP address ranges for private networks, Azure Firewall can perform Secure Network Address Translation (SNAT) on your outgoing requests. Incoming traffic can be translated using Destination Network Address Translation (DNAT).
  • Threat intelligence: Azure Firewall can automatically block incoming traffic originating from IP addresses known to be malicious. These addresses and domains come from Microsoft’s threat intelligence feed.
  • Multiple IPs: Up to 250 IP addresses can be associated with your firewall, which helps with SNAT and DNAT.
  • Monitoring: Azure Firewall is fully integrated with Azure Monitor for data analysis and alerting.
  • Forced tunneling: You can route all internet-bound traffic to another device, such as an on-premises edge firewall.

Azure Firewall provides an additional and centralized security boundary to your systems, ensuring an extra layer of safety.

So far, we have looked at securing access into and between services that use VNETs, such as VMs. Some services don’t use VNETs directly but instead have their firewall options. These firewall options often include the ability to either block access to the service based on IPs or VNETs, and when this option is selected, it uses a feature called service endpoints.

Network Security Groups – Network Connectivity and Security

NSGs allow you to define inbound and outbound rules that will allow or deny the flow of traffic from a source to a destination on a specific port. Although you define separate inbound and outbound rules, each rule is stateful. This means that the flow in any one direction is recorded so that the returning traffic can also be allowed using the same rule.

In other words, if you allow HTTPS traffic into a service, then that same traffic will be allowed back out for the same source and destination.

We create NSGs as components in Azure and then attach them to a subnet or network interface on a VM. Each subnet can only be connected to a single NSG, but any NSG can be attached to multiple subnets. This allows us to define rulesets independently for everyday use cases (such as allowing web traffic) and then reusing them across various subnets.

When NSGs are created, Azure applies several default rules that effectively block all access except essential Azure services.

If you create a VM in Azure, a default NSG is created for you and attached to the network interface of the VM; we can see such an example in the following screenshot:

Figure 8.5 – Example NSG ruleset

In the preceding figure, we can see five inbound rules and three outbound. The top two inbound rules highlighted in red were created with the VM – in the example, we specified to allow RDP (3389) and HTTP (80).

The three rules in the inbound and outbound highlighted in green are created by Azure and cannot be removed or altered. These define a baseline set of rules that must be applied for the platform to function correctly while blocking everything else. As the name suggests on these rules, AllowVnetInBound allows traffic to flow freely between all devices in that VNET, and the AllowAzureLoadBalancerInBound rule allows any traffic originating from an Azure load balancer. DenyAllInBound blocks everything else.

Each rule requires a set of options to be provided:

  • Name and Description: For reference; these have no bearing on the actual service. They make it easier to determine what it is or what it is for.
  • Source and Destination port: The port is, of course, the network port that a particular service communicates on – for RDP, this is 3389; for HTTP, it is 80, and for HTTPS, it is 443. Some services require port mapping; that is, the source may expect to communicate on one port, but the actual service communicates on a different port.
  • Source and Destination location: The source and destination locations define where traffic is coming from (the source) and where it is trying to go to (the destination). The most common option is an IP address or list of IP addresses, and these will typically be used to define external services.

For Azure services, we can either choose the VNET – that is, the destination is any service on the VNET the NSG is attached to – or a service tag, which is a range of IPs managed by Azure. Examples may include the following:

– Internet: Any address that doesn’t originate from the Azure platform

– AzureLoadBalancer: An Azure load balancer

– AzureActiveDirectory: Communications from the Azure Active Directory service

– AzureCloud.EastUS: Any Azure service in the East US region

As we can see from these examples, with the exception of the internet option, they are IP sets that belong to Azure services. Using service tags to allow traffic from Azure services is safer than manually entering the IP ranges (which Microsoft publishes) as you don’t need to worry about them changing.

  • Protocol: Any, TCP, UDP, or ICMP. Services use different protocols, and some services require TCP and UDP. You should always define the least access; so, if only TCP is needed, only choose TCP. ICMP protocol is used primarily for Ping.
  • Priority: Firewall rules are applied one at a time in order, with the lowest number, which is 100, being used last. Azure applies a Deny All rule to all NSGs with the lowest priority. Therefore, any rule with a higher priority will overrule this one. Deny all is a failsafe rule – this means everything will be blocked by default unless you specifically create a rule to allow access.

Through the use of NSGs, we can create simple rules around our VNET-integrated services and form part of an effective defense strategy. There may be occasions, however, when you want to apply different firewall rules to other components within the same subnet; we can use Application Security Groups (ASGs) for these scenarios.

Azure public DNS zones – Network Connectivity and Security

If you own your domain, bigcorp.com, you can create a zone in Azure and then configure your domain to use the Azure name servers. Once set up, you can then use Azure to create, edit, and maintain the records for that domain.

You cannot purchase domain names through Azure DNS, and Azure does not become the registrar. However, using Azure DNS to manage your domain, you can use RBAC roles to control which users can manage DNS, Azure logs to track change, and resource locking to prevent the accidental deletion of records.

We have looked at the different options for setting up VNETs with IP addressing and name resolution; we will now investigate to ensure secure communications to and between our services.

Implementing network security

Ensuring secure traffic flow to and between services is a core requirement for many solutions. An example is an external communication to a VM running a website – you may only want to allow traffic to the server in a particular port such as HTTPS over port 443. All other traffic, such as SMTP, FTP, or file share protocols, need to be blocked.

It isn’t just inbound traffic that needs to be controlled; blocking outbound traffic can be just as important. For many organizations today, ensuring you are protected from insider threats is just as crucial, if not more so, than external threats. For this reason, we may want to block all but specific outbound access so that if a service is infected by malware, it cannot send traffic out – known as data exfiltration.

Important Note

Data exfiltration is a growing technique for stealing data. Either by manually logging on to a server or through malware infection, data is copied from an internal system to an external system.

As solutions become more distributed, the ability to control data between components has also become a key design element and can often work to our advantage. A typical and well-used architectural pattern is an n-tier architecture. The services in a solution are hosted on different layers – a User Interface (UI) at the front, a data processing tier in the middle, and a database at the back. Each tier could be hosted on its subnet with security controls between them. In this way, we can tightly control who and what has access to each tier individually, which helps prevent any attacker from gaining direct access to the data, as we can see in the following example:

Figure 8.4 – N-tier architecture helps protect resources

In the example, in the preceding figure, the UI tier only allows traffic from the user over HTTP (port 443), and as the UI only contains frontend logic and no data, should an attacker compromise the service, they can only access that code.

The next tier only allows traffic from the UI tier; in other words, an external attacker has no direct access. If the frontend tier was compromised, an attacker could access the business logic tier, but this doesn’t contain any actual data.

The final tier only accepts SQL traffic (port 1433) from the business tier; therefore, a hacker would need to get past the first two tiers to gain access to it.

Of course, other security mechanisms such as authentication and authorization would be employed over these systems, but access by the network is often considered the first line of defense.

Firewalls are often employed to provide security at the network level. Although Azure provides discrete firewall services, another option is often used to provide simpler management and security – Network Security Groups (NSGs).

Azure DNS – Network Connectivity and Security

Once we have our resources built in Azure, we need to resolve names with IP addresses to communicate with them. By default, services in Azure use Azure-managed DNS servers. Azure-managed DNS provides name resolution for your Azure resources and doesn’t require any specific configuration from you.

Azure-managed DNS servers

Azure-managed DNS is highly available and fully resilient. VMs built in Azure can use Azure-managed DNS to communicate with other Azure services or other VMs in your VNETs without the need for a Fully Qualified Domain Name (FQDN).

However, this name resolution only works for Azure services; if you wish to communicate with on-premises servers or need more control over DNS, you must build and integrate with your DNS servers.

When configuring a VNET in Azure, you can override the default DNS servers. In this way, you can define your DNS servers to ensure queries to your on-premises resources are resolved correctly. You can also enter the Azure-managed DNS servers as well; if your DNS solution cannot resolve a query, the service would then fall back to the alternate Azure DNS service. The address for the Azure DNS service is 168.63.129.16.

To change the default DNS servers in Azure, perform the following steps:

  1. Navigate to the Azure portal at https://portal.azure.com.
  2. In the search bar, search for and select Virtual Networks.
  3. Select your VNET.
  4. On the left-hand menu, select DNS servers.
  5. Change the default option from Default (Azure-provided) to Custom.
  6. Enter your DNS servers, optionally followed by the Azure internal DNS server address.

The following screenshot shows an example of how this might look:

Figure 8.3 – Setting up custom DNS servers

These settings must be set up on each VNET that you wish to set up the custom DNS settings.

Tip

Be careful how many DNS servers you set. Each DNS server will be queried in turn, and if you put too many, the request will time out before it reaches the final server. This can cause issues if you need to fall back to the Azure DNS service for Azure-hosted services.

You can also leverage Azure private DNS, using private zones, for your internal DNS needs, using your custom domain names.

Azure private DNS zones

Using custom DNS allows you to use your domains with your Azure resources without the need to set up and maintain your DNS servers for resolution.

This option can provide much tighter integration with your Azure-hosted resources as it allows automatic record updates and DNS resolution between VNETs. As a managed solution, it is also resilient without maintaining separate VMs to run the DNS server.

Azure also provides you with the ability to manage your external domain records. Using Azure DNS zones, you can delegate the name resolution for your custom domain to Azure’s DNS servers.

Private zones are also used with PrivateLink IP services, which we will examine in the next section, Implementing network security.